Guide: Ghost blog on Fly.io using Tigris S3 Object Storage (part 3)

This is part 3 in a series about self hosting a Ghost blog on Fly.io. It assumes you have a running Ghost app on Fly (either using SQLite or MySQL).
In the first two posts we covered:
- Setting up a Ghost blog using SQLite
- Setting up a Ghost blog using MySQL
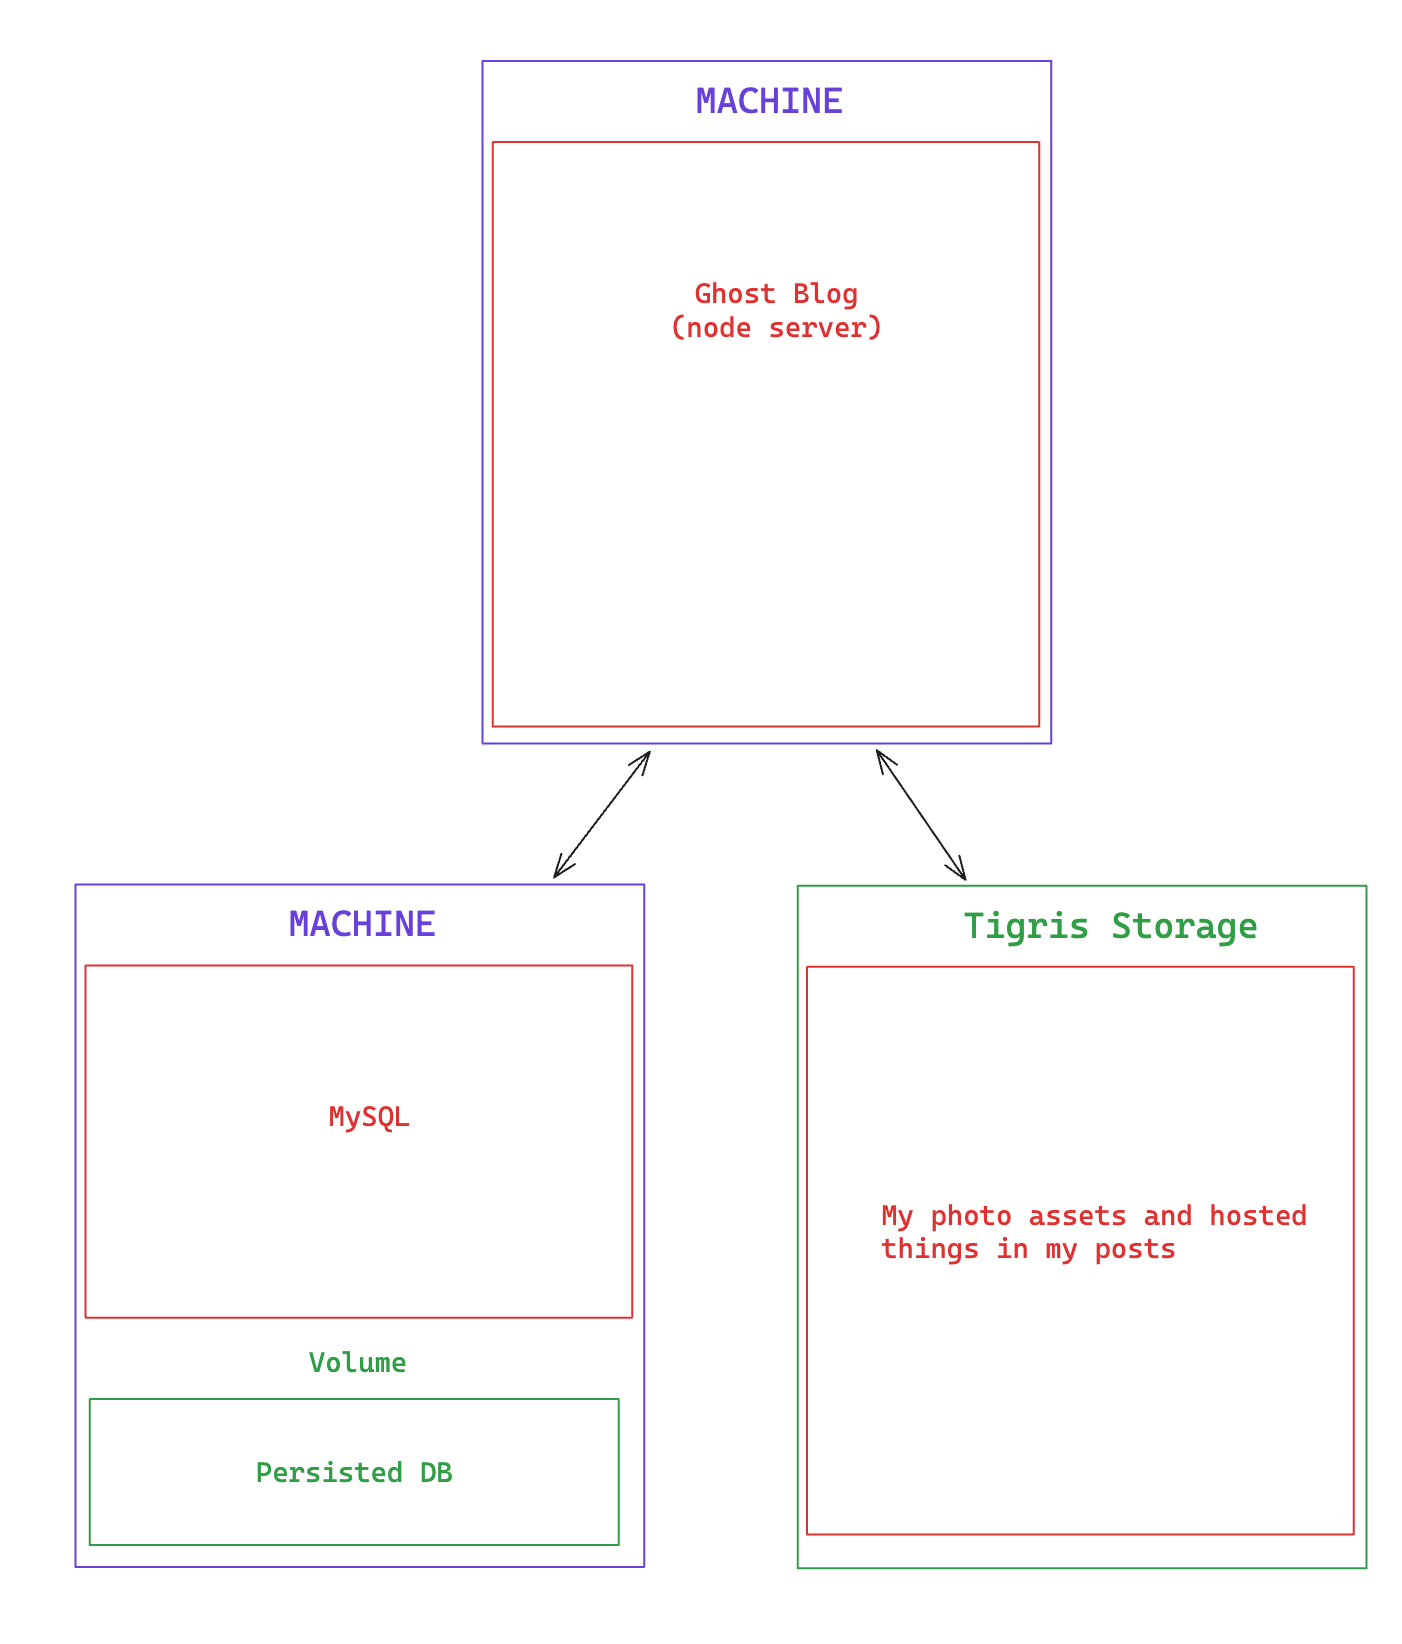
Now we'll move onto saving assets (in particular photos that you upload to your blog posts) in a S3 Object Storage bucket.
This is what we're aiming for:

Tigris is awesome
Tigris Global Object Store is a s3 compliant storage system built on Fly's infrastructure. We'll be connecting it to our Ghost Blog. For more details:

Step 1: Create a Dockerfile
If you've been following the guides up until this point then in your fly.toml file you might have the line:
# fly.toml

# erase this!
[build]
  image = 'ghost:5.81.0'
But in addition to our Ghost image, we also need an Ghost s3 storage library. So, remove the image line from the fly.toml and create a Dockerfile that looks like
FROM ghost:5.81.0-alpine
WORKDIR /var/lib/ghost
RUN npm install --prefix /tmp/ghos3 ghos3 && \
  cp -r /tmp/ghos3/node_modules/ghos3 current/core/server/adapters/storage/s3 && \
  rm -r /tmp/ghos3

RUN npm install ghos3 && npm install aws-sdk
This Dockerfile was written by underlost here: https://github.com/underlost/flyio-ghost-s3
I've modified it to use ghos3 which is a recent rewrite of ghost-storage-adapter-s3.
Step 2: Create a Tigris Object Storage Bucket
You can basically follow the guide for Tigris, but the short version is:
fly storage create <my_bucket_name> --publicYou'll get some credentials that you'll want to keep for later:
BUCKET_NAME: my_bucket_name
AWS_ENDPOINT_URL_S3: https://fly.storage.tigris.dev
AWS_ACCESS_KEY_ID: tid_xxxxxx
AWS_SECRET_ACCESS_KEY: tsec_xxxxxx
Step 3: Modify fly.toml and set secrets
Add the following to you fly.toml under [env]
# fly.toml
# don't forget to replace "my_bucket_name" with your own name

[env]
  ##### Tigris S3
  storage__active = "s3"
  # storage__s3__accessKeyId = "" # set as secret
  # storage__s3__secretAccessKey = "" # set as secret
  storage__s3__region = "auto"
  storage__s3__bucket = "my_bucket_name"
  storage__s3__assetHost = "https://fly.storage.tigris.dev/my_bucket_name"
storage__s3__endpoint = "https://fly.storage.tigris.dev"- region is auto
- the asset host (storage__s3__assetHost) needs the bucket name in the path
- for uploading (storage__s3__endpoint) should omit the bucket name
Next, set secrets for your app using the credentials from when you made the bucket:
fly secrets set --stage storage__s3__accessKeyId=tid_xxxx storage__s3__secretAccessKey=tsec_xxxStep 4: Deploy and check that it works:
Run fly deploy to deploy your app.
Then create a draft blog post and try uploading an image.
You can see the image in your bucket by running the following:
flyctl storage dashboard <bucket_name>This should open up Tigris' dashboard and you can browse the files in your bucket. It's neato burrito.
Final Example:
Putting it all together with MySQL and Tigris Object Storage your fly.toml might look like:
# fly.toml app configuration file generated for nathan-ghost-blog on 2024-07-13T22:34:38+09:00
#
# See https://fly.io/docs/reference/configuration/ for information about how to use this file.
#

app = 'my-ghost-blog'
primary_region = 'sea'

[env]
  ##### MYSQL Database
  database__client = 'mysql'
  # database__connection__user = '' # set as secret
  # database__connection__password = '' # set as secret
  database__connection__host = 'my-blog-db.internal'
  database__connection__port = '3306'
  database__connection__database = 'blog_db'
  database__connection__useSSL = 'false'
  database__useSSL = 'false'
  ##### Tigris S3
  storage__active = "s3"
  # storage__s3__accessKeyId = "" # set as secret
  # storage__s3__secretAccessKey = "" # set as secret
  storage__s3__region = "auto"
  storage__s3__bucket = "my-blog-storage"
  storage__s3__assetHost = "https://fly.storage.tigris.dev/my-blog-storage"
  storage__s3__endpoint = "https://fly.storage.tigris.dev"
  url = 'https://my-ghost-blog.fly.dev'

[http_service]
  internal_port = 2368
  force_https = true
  auto_start_machines = true
  min_machines_running = 0
  processes = ['app']

[[vm]]
  memory = '1gb'
  cpu_kind = 'shared'
  cpus = 1


